
Multi-pass GLSL renderer for Raspberry Pi. Headless GLES2, out to SPI panels, HDMI, images or hardware H264.

ghee compiles a scene (GLSL fragment shaders, live parameters, optionally Python driving them) and renders it straight on the GPU:
- to image files on disk
- to a SPI panel
- to an HDMI display
- as an H264 or MJPEG stream, including a live editor in your browser
Rendering is GLES2 through DRM/GBM on a stock Lite image, with direct scanout for HDMI.
| Hardware | OS | Driver |
|---|---|---|
| Pi 1, Pi Zero, Pi Zero W (armv6) | Raspberry Pi OS bookworm or trixie | vc4 |
| Pi 2, Pi 3, Pi Zero 2 W (arm64) | Raspberry Pi OS bookworm or trixie | vc4 |
| Pi 4 (arm64) | Raspberry Pi OS bookworm or trixie | v3d + vc4 |
| Pi 5 (arm64) | Raspberry Pi OS bookworm or trixie | v3d + vc4 |
| Desktop Linux (x86_64) | any current distro | Mesa |
Hardware H264 encoding works on every Pi except the Pi 5, which has no encoder block and falls back to ffmpeg/libx264. The distributed armhf package is compiled for ARMv6, so it runs on every Pi back to the Pi 1!
Pick the asset matching your board from Releases:
sudo apt install ./python3-ghee_*.deb
To build from source you need a compiler, CMake, and the GLES/DRM development headers. On Raspberry Pi OS or Debian:
sudo apt install cmake pkg-config libdrm-dev libgbm-dev libegl1-mesa-dev libgles2-mesa-dev
Then use uv:
uvx ghee-render serve --demo    # try it
uv add ghee-render              # in a project
or pip, inside a venv:
pip install ghee-render
Optional extra: ghee-render[drivers] for the bundled SPI display drivers.
Software H264 shells out to ffmpeg, and nothing here installs it for you:
sudo apt install ffmpeg
Only the Pi 5 and desktop need it, since every earlier Pi has the hardware
encoder. Without it --h264 and the console's H264 stream exit saying so;
everything else works.
Without CMake or those headers the install fails, naming what is missing. To
install anyway: GHEE_LIB=/path/to/libghee.so renders with an engine already
on the host, GHEE_SKIP_ENGINE=1 installs the Python side alone (ghee.scene
and ghee.isf, no rendering).
The renderer picks its GPU node automatically: $GHEE_DRI, then a render node
(/dev/dri/renderD*), then a card node. --display kms instead takes the first
card with a connected mode. Override either with $GHEE_DRI or --dri.
Render to numbered PNGs (bundled scenes resolve by name; your own directories
join the lookup through $GHEE_SCENES):
ghee render bars -o frame.####.png --frames 60
A .py scene is imported to build its passes, so loading or switching to one
runs its code. Treat a scenes directory, and anything you put on $GHEE_SCENES,
as code you have chosen to run.
Or write raw frames to stdout and pipe them into ffmpeg. --timestep pins
engine time to frame * S, so the render is reproducible (frame N always
renders at time N*S):
ghee render bars -o - --frames 300 --timestep 0.0166667 |
  ffmpeg -f rawvideo -pix_fmt rgba -s 320x240 -framerate 60 -i - out.mp4
Or stream it as H264 (raw Annex-B; pipe it anywhere):
ghee render trail --h264 - --fps 30 | mpv -
On boards with the Broadcom hardware encoder (original Zero through Pi 4) the
frame goes GPU -> encoder with no CPU copy. That is measured on a Pi Zero W and
inferred across the rest of the range from the shared encoder block. The Pi 5
dropped the encoder, so there and on desktop ffmpeg encodes the readback with
libx264 and has to be on $PATH. --bitrate sets bits/s.
Or scan it straight out to the HDMI display; details in Hardware displays:
sudo ghee render trail --display kms
Or open the browser console on the bundled examples and edit the GLSL live:
ghee serve --demo
ghee serve <your_scenes_dir> serves your own scenes instead. The console
preview streams H264 (WebCodecs) when the browser can, MJPEG otherwise.
A scene is JSON: an ordered list of passes, each with its own GLSL fragment shader.
This is bars.scene.json, one of the bundled examples:
{
  "version": 1,
  "passes": [
    {
      "name": "main",
      "shader": "bars.glsl",
      "arrays": [{ "name": "amplitudes", "size": 16 }],
      "params": {
        "base": { "type": "color", "value": [0.04, 0.04, 0.04] },
        "bar": { "type": "color", "value": [0.1, 0.9, 0.4] }
      }
    }
  ]
}
and bars.glsl next to it:
void main() {
  vec2 uv = v_texCoord;
  int last = amplitudes_size - 1;
  float fi = uv.x * float(last);
  int i0 = int(floor(fi));
  float h = mix(amplitudes_at(i0), amplitudes_at(min(i0 + 1, last)), fract(fi));
  float m = step(uv.y, h);
  gl_FragColor = vec4(mix(base, bar, m), 1.0);
}
Optionally, a pass can also carry its GLSL inline in a "code" string.
A scene can also be a Python file: a SceneController that builds the same
passes in code and feeds them its own data per frame; see
ghee from Python.
The pass model is heavily inspired by Shadertoy. Passes render in order, each one a fragment shader drawing into its own buffer. A pass reads other passes through numbered channel samplers: a channel bound to an earlier pass sees the current frame, and a channel bound to the pass itself (or a later one) sees the previous frame, and the last pass is what reaches the output.
A pass can render at its own resolution with "size": [w, h]: a tiny 32x18
precompute buffer, or a heavy effect at half size. Passes sample each other
through normalized coordinates, so a consumer never has to know a producer's
size. The last pass takes no size; it renders at the output resolution that
reaches readback, the display, or the encoder.
A scene is usually a JSON file. It can also be a Python file, referred to as a procedural scene; see ghee from Python below.
Every pass's GLSL is compiled with this simple preamble:
uniform float time;                 // seconds since start
uniform vec2  resolution;           // buffer size in pixels
varying vec2  v_texCoord;           // 0..1 across the buffer
// gl_FragCoord is remapped to the varying, so ShaderToy
// gl_FragCoord.xy / resolution math is exact

// declared array, e.g. {"name": "amplitudes", "size": 16}:
const int amplitudes_size;          // = 16
float amplitudes_at(int i);         // one element
float amplitudes_sample(float t);   // interpolated, t in 0..1
// arrays are bound as 1xN textures

// a 2D input, e.g. {"name": "text", "size": [96, 16]}:
float text_sample2(vec2 uv);        // one fetch, normalized uv
// the host feeds w*h floats: a mask, host-rasterized text, an image

// per channel: uniform sampler2D iChannel0..N
// per param:   uniform <type> <name>
Channels are declared on the pass by "buffer" name:
{ "name": "compose", "shader": "compose.glsl", "channels": [{ "buffer": "compose" }] }That pass samples its own previous frame through iChannel0:
// compose.glsl: everything drawn so far, fading a little each frame
void main() {
  vec3 prev = texture2D(iChannel0, v_texCoord).rgb;
  gl_FragColor = vec4(prev * 0.95, 1.0);
}
Params are typed uniforms declared on the pass, with optional range metadata:
{ "params": { "gain": { "type": "float", "value": 0.45, "min": 0, "max": 1, "step": 0.01 } } }which the preamble turns into uniform float gain;. The console renders every
param as a live control. Types: float, int, bool, color (a vec3 in the
shader), vec2/3/4, and string. A bool takes true or false and reaches the
shader as uniform bool. A string never becomes a uniform: the
scene's controller consumes it (on_param) for host-side work like
rasterizing text, and options turns its text box into a dropdown. Params
declared on the scene instead of a pass are shared: one value, every pass.
Rendering is three calls: load a scene, set it up, render frames.
from ghee import load_scene
from ghee.engine import Renderer

scene, _ = load_scene("bars.scene.json")
r = Renderer(320, 240)
r.setup(scene)
frame = r.render()  # (h, w, components) numpy array
When a scene declares arrays you must pass them to render() with a
single function returning the data for a given array:
from math import sin


def my_source(size, frame):
    # size floats in 0..1
    return [0.5 + 0.5 * sin(frame / 15.0 + k) for k in range(size)]


for i in range(300):
    frame = r.render(lambda name, size: my_source(size, i))
A declared array with no data gets an animated sinewave placeholder.
One can build a whole procedural scene in Python with a
SceneController class, using provide() to fill the named arrays:
from math import sin

from ghee import ArrayInput, Pass, Scene, SceneController


class Pulse(SceneController):
    def build(self, base):
        main = Pass(
            name="main",
            code="void main() { gl_FragColor = vec4(vec3(level_at(0)), 1.0); }",
            arrays=[ArrayInput("level", 1)],
        )
        return Scene(passes=[main])

    def provide(self, name, size, frame):
        if name == "level":
            return [0.5 + 0.5 * sin(frame / 15.0)]
return Noneghee serve <scenes_dir> (or --demo) starts a small web editor on
127.0.0.1:8090: live preview of the running scene, GLSL editing per pass with
compile errors inline, param sliders, pass muting, and a filter picker. Apply
recompiles the running renderer.
Save writes a modified copy to <scenes_dir>/modified/ for JSON scenes; a
procedural scene saves its param values and filter list as a sidecar applied
over the scene's defaults on load.
The console embeds in Python too, with array names mapped to providers:
from ghee.console.server import run

run(arrays={"amplitudes": my_source})  # my_source(size, frame) -> floats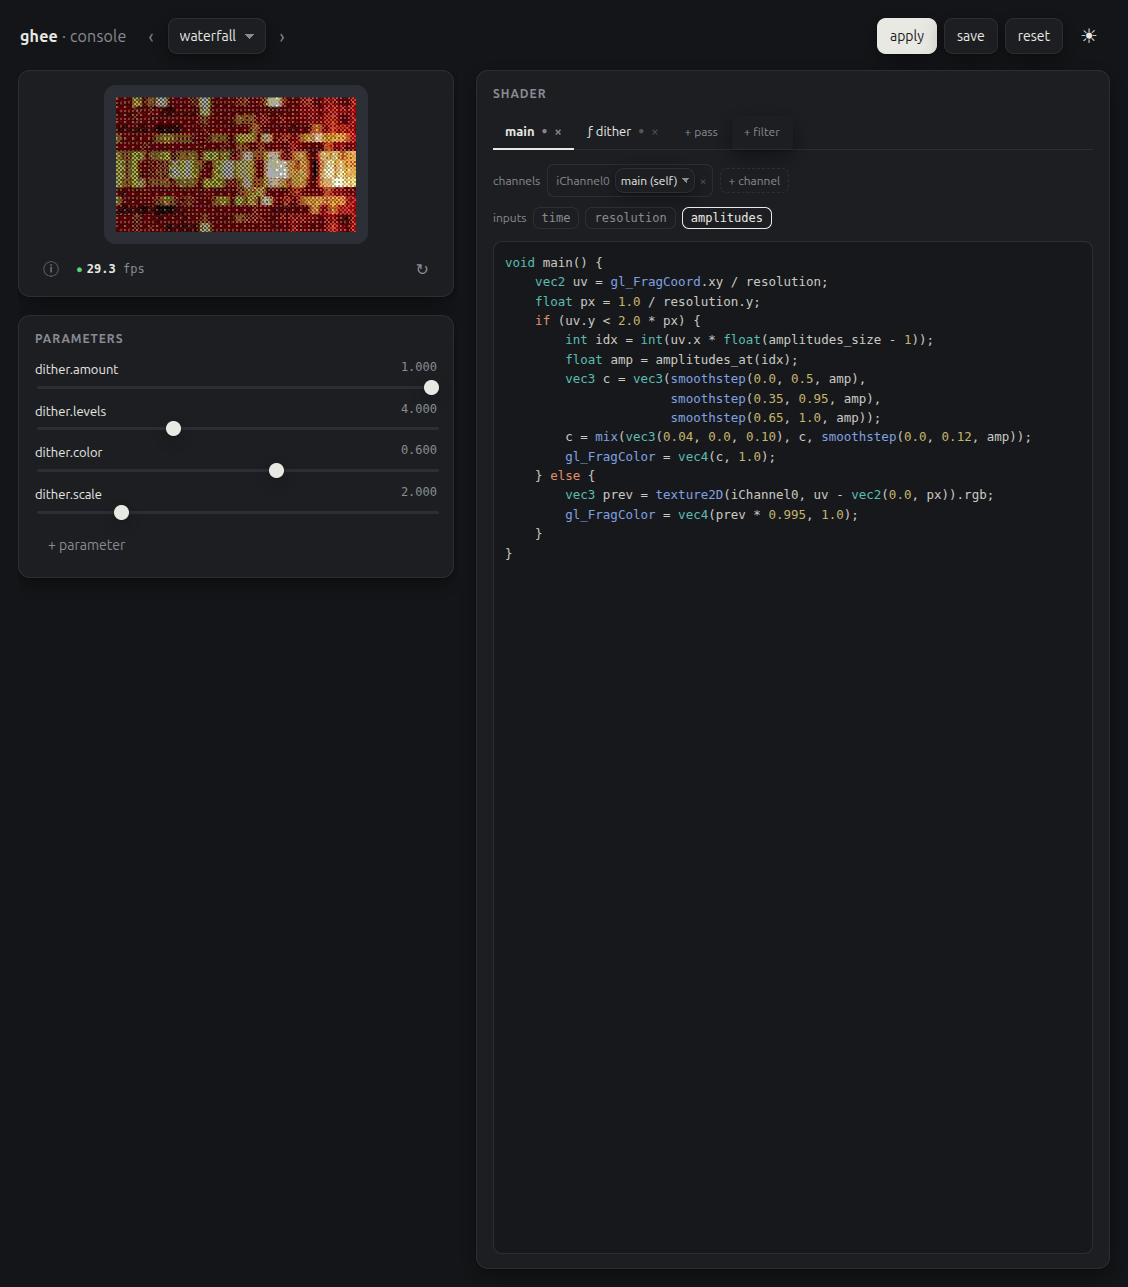
The console has no authentication and compiles whatever GLSL is posted to it,
so it binds loopback by default. To expose it to your network pass --host 0.0.0.0,
do that only on a network you trust.
A filter is a named single pass post process appended after the scene's own passes. A scene can declare them:
{ "passes": [ ... ], "filters": ["dither"] }or the CLI can add them ad hoc, in order, after whatever the scene declares:
ghee render bars --filters dither --display ssd1306
The bundled dither is an ordered 4x4 Bayer dither, which is what makes
grayscale scenes readable on 1-bit panels. Your own <name>.filter.json
files join the registry through $GHEE_FILTERS (colon-separated
directories), and show up everywhere: the CLI, the console's picker, an
embedding app.
ghee isf import converts an Interactive Shader Format
shader into a ghee scene or filter.
ghee isf import shader.fs                        # -> shader.scene.json
ghee isf import https://host/shader.fs -o s.json
ghee isf import shader.fs --as-filter            # -> shader.filter.json
ghee isf import shader.fs --size 640x480
Three kinds of ISF are refused:
FLOATpass buffers. ghee's pass buffers are 8-bit RGB.IMPORTEDexternal images. ghee scenes have no image inputs.- vertex shader, or a body reading a varying: ghee's vertex shader is fixed.
ghee displays                      # list displays and whether they work here
ghee render scene.json --display st7789
sudo ghee render scene.json --display kms
kms is the connected HDMI (or any KMS) display: the engine takes DRM master
and page-flips its render buffers straight to the connector, zero copy, paced
by the panel's own refresh. It needs root and a card nothing else is driving,
so a headless Pi is the natural home; a running desktop session already owns
the card.
The two bundled drivers are reference implementations for the exact panels
this project was built on: st7789 (135x240 SPI LCD, pins and offsets as
wired on my Pi) and ssd1306 (128x32 I2C 1-bit OLED). Both live behind the
[drivers] extra. For other panels, or the same controllers wired
differently, write a small driver class (subclass DisplayDriver, implement
write(frame)) and register it through the ghee.drivers entry point group;
it gets picked up by name. Making the bundled drivers configurable (size,
pins, offsets) is on the roadmap.
- GLES2 only: no compute, geometry or tessellation shaders, and on VC4 no
derivatives (
fwidth) and no multisampled FBOs. - File, stream and panel output all pay a synchronous
glReadPixels. GLES2 has no asynchronous readback, so the cost scales with output size. --display kmsneeds root, because it takes DRM master, and a card no compositor is holding.- Hardware H264 is the Broadcom encoder, which the Pi 5 does not have. There and on desktop the software path costs a CPU libx264 encode and needs ffmpeg installed.
- The bundled panel drivers are fixed to the panels they were written for
(
st7789135x240,ssd1306128x32). Anything else needs a driver class. - The web console has no authentication.
A render says there is no GL device. The engine probes $GHEE_DRI, then
/dev/dri/card0, /dev/dri/renderD128, then any other card. Point it at the
right one with --dri or $GHEE_DRI, and check your user is in video (and
render, on desktop). ghee displays reports what works on the host.
The install failed with C engine build failed. CMake or the GLES/DRM
headers are missing. Install them (see Install) and try again, or use a release
.deb. GHEE_LIB and GHEE_SKIP_ENGINE=1 install without building it.
--h264 or the console stream says there is no ffmpeg on PATH. That board
has no Broadcom encoder, so ghee encodes with ffmpeg and libx264 instead.
sudo apt install ffmpeg.
--display kms cannot take DRM master. Something else owns the card, almost
always a desktop session.
Illegal instruction on a Pi 1 or an original Pi Zero. Those are ARMv6, and
Debian's armhf is built for ARMv7. Use the armhf release asset, which is built
against Raspbian.
The console preview falls back to MJPEG in a browser that has WebCodecs.
H264 playback needs a secure context. 127.0.0.1 is one; a plain-HTTP LAN
address is not.
The suite is not shipped in the package and must be run from a checkout:
git clone https://github.com/holofermes/ghee
cd ghee
pip install -e '.[test]'
python -m pytest
The render tests need a GPU node and skip cleanly without one. Every bundled example renders against a committed golden image, compared with a tolerance that one baseline passes on both desktop Mesa and VC4.
The CI runners have no GPU node, so the render and golden tests always skip there and the badge covers the rest of the suite.
MIT.
